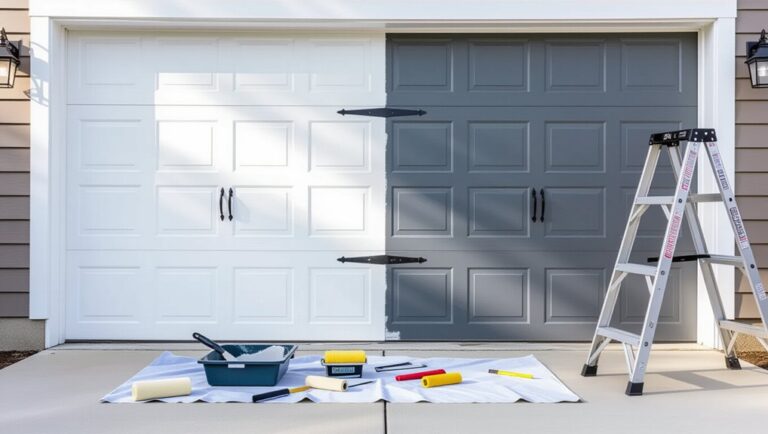
Mask weatherstripping, hardware, and trim, then cover nearby siding and the driveway; paint when it’s 50–85°F with low humidity and no rain for 24 hours. Scrub the door with TSP substitute, rinse, and let it dry fully. Scrape flaking paint, treat rust with a phosphoric converter, fill dents, then sand 120–150 grit and wipe clean. Spot-prime bare metal, sand lightly, then roll enamel top-down in small sections, overlapping to keep a wet edge; more pro tips are ahead.
Key Takeaways
- Clean and degrease the door, rinse thoroughly, and let it dry completely before sanding or painting.
- Scrape flaking paint, sand smooth (120–220 grit), and treat rust with converter; fill dents and feather edges.
- Spot-prime bare metal, then lightly sand and tack-wipe the primer for a smooth base.
- Use a foam mini-roller and angled sash brush, painting in small sections while maintaining a wet edge.
- Work top-to-bottom, overlap passes 1–2 inches, and avoid back-brushing once tacky to prevent brush marks and lap lines.
Mask, Protect, and Pick Ideal Paint Weather
Before you open a paint can, mask and protect everything you don’t want coated: run painter’s tape along the door frame, weatherstripping, handles, hinges, and window trim, then hang plastic sheeting or rosin paper over adjacent siding, brick, lights, and the driveway directly under the door’s swing and drip line. Press tape edges firmly with a putty knife to prevent seepage, and slit plastic around hardware so it lays flat. Wear Protective gear: nitrile gloves, safety glasses, and a respirator rated for paint fumes. Check the weather forecast and plan for 50–85°F, low humidity, and no rain for 24 hours; avoid direct, hot sun and windy gusts that blow debris onto wet paint. Open the door slightly for ventilation, then lock it.
Degrease and Rinse the Metal Garage Door
With everything masked off and the weather cooperating, you can focus on getting the metal truly clean so paint will bond. Mix a degreaser or TSP substitute per label in a bucket of warm water. Wearing gloves and eye protection, scrub panels with a non-scratch pad, working top to bottom so dirty runoff doesn’t streak clean sections. Hit the perimeter, hinges, handles, and bottom seal area where road film collects; keep garage door insulation dry by avoiding heavy flooding at seams and edges. Rinse immediately with a hose set to a gentle spray, and chase remaining suds with clean water. Wipe hardware and weatherstripping with a damp rag. Let the door air-dry completely; moisture left behind can compromise Security enhancements like lock cylinders.
Remove Rust, Dents, and Loose Paint
After the door dries, inspect every panel seam and lower edge to identify rust and corrosion, then mark the affected spots. Tap out dents and dings from the backside when possible, or apply a thin layer of metal-rated filler, let it cure, and sand it flush. Scrape all loose or blistered paint, then feather the surrounding edges with progressively finer sandpaper so you’re left with a smooth, stable surface for primer.
Identify Rust And Corrosion
Even if the door looks mostly intact, you’ll need to hunt down rust, corrosion, dents, and any loose or flaking paint because they’ll telegraph through the new finish and shorten its lifespan. Start your rust inspection by washing off dirt, then drying fully so orange staining and bubbling paint stand out. Scan horizontal seams, panel edges, hinge points, bottom rails, and around fasteners where water sits. Run a gloved hand over suspect areas; roughness usually means oxidation under paint. Press lightly with a putty knife: soft, pitted metal signals deeper corrosion, while crisp metal suggests surface rust only. Mark every spot with painter’s tape. Check the door’s interior face too. This mapping step drives corrosion prevention by targeting prep where it’s needed.
Repair Dents And Dings
Once you’ve flagged every problem area, start by stripping the door back to solid material: scrape all loose or flaking paint with a carbide scraper or stiff putty knife, then sand the perimeter of each spot to feather the edges (80–120 grit for removal, 150–220 grit to smooth). Treat rust you expose with a phosphoric-acid rust converter, then wipe clean and let it cure per label. For shallow dings, scuff to bare metal, degrease, and apply a thin skim of metal-reinforced body filler; block-sand flat with a rigid block to keep the panel true. For deeper dents, tap from the backside with a body hammer and dolly before filling. Keep filler off seams so Garage door insulation stays sealed. Finish by resealing joints with compatible sealant—core Weatherproofing techniques.
Scrape And Feather Paint
Before you touch primer, scrape every blistered or chalky section down to sound paint or bare metal using a carbide scraper or stiff putty knife, working from the center of the failure outward so you don’t undercut stable edges. Hit rust with a wire cup brush or 80-grit paper until you see clean, bright metal; treat remaining staining with a rust converter if needed. Feather the perimeter with 120-grit, then 180–220-grit, sanding 2–3 inches past the repair so you can’t feel a ridge with your fingertips. Vacuum dust, wipe with a degreaser, then tack cloth. This smooth gradation prevents telegraphing and keeps brush marks from pooling at edges, supporting clean Color matching and sharp decorative accents.
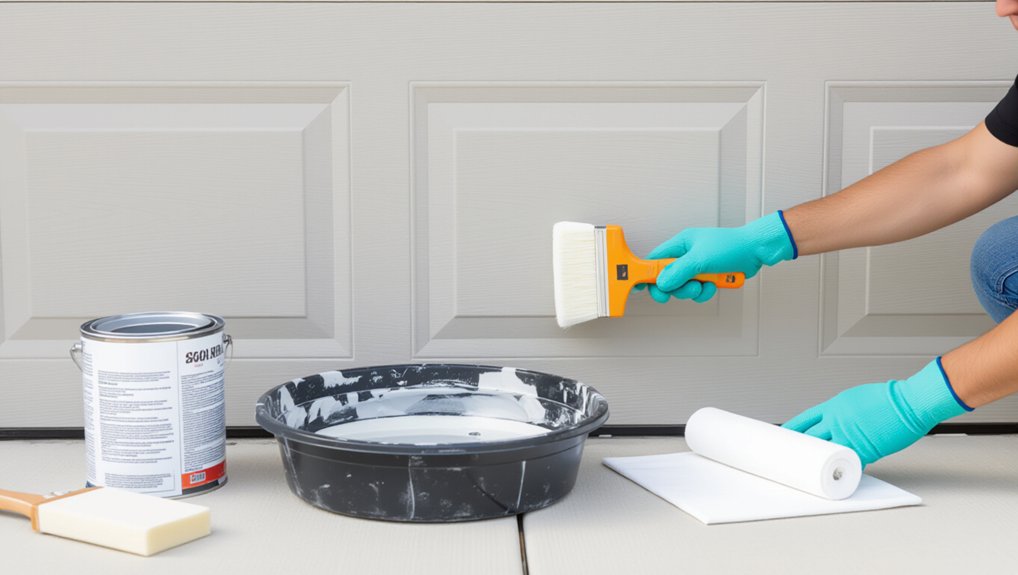
Sand for Adhesion and a Smooth Finish
After you’ve cleaned and dried the door, sand the metal to create a mechanical “tooth” that primer can lock onto and to level minor imperfections. For Surface preparation, start with 120–150 grit on a sanding block for flat panels, then switch to a medium Scotch-Brite pad for profiles and recessed sections. Keep strokes uniform, following the panel direction, and feather edges where old paint meets bare metal. Don’t over-sand to shiny steel; you want a consistent, dull scratch pattern. Vacuum the dust, then wipe with a lint-free cloth dampened with denatured alcohol or a degreaser residue-free cleaner. Inspect under raking light and re-sand any glossy spots. This step directly improves paint durability and reduces brush-mark telegraphing later.
Prime Metal (and Rust Spots) for Even Color
Because bare metal and repaired rust absorb coatings differently than existing paint, you’ll get a more uniform topcoat by priming all exposed steel and any rust-treated areas with the right primer. After Metal preparation, vacuum dust and wipe with a lint-free cloth dampened with solvent or degreaser; let it fully flash off. Feather any sand-through edges, then spot-prime them first to prevent “halos.” For rust treatment zones, confirm the converter or remover is cured per label, then scuff lightly to provide tooth. Apply a thin, even coat of metal primer with smooth, overlapping strokes, working into panel seams and around hardware. Don’t overbuild; heavy primer ridges telegraph through finish. Let primer dry, then lightly sand and tack-wipe before moving on.
Choose Garage Door Paint, Sheen, and Rollers
Let the primer fully cure per the can, then pick a paint system that bonds to primed steel and stands up to sun, moisture, and abrasion. Choose an exterior-grade 100% acrylic enamel, or a direct-to-metal alkyd if your climate is cool and dry. Avoid interior wall paint. For sheen, use satin for balanced washability and defect-hiding; go semi-gloss if you want maximum cleanability and sharper Garage aesthetics, but it’ll highlight dents. Select a color using color coordination with siding, trim, and roof; darker tones show dust, while midtones mask grime. Use a 4–6-inch foam mini-roller for rails and stiles and a 3/8-inch microfiber roller for flat panels. Pair rollers with a high-quality angled sash brush for tight edges.
Apply Paint Fast: Top-to-Bottom, Keep a Wet Edge (No Marks)
Start at the top panel and roll downward so gravity doesn’t pull fresh paint into already-finished sections. Keep a wet edge by overlapping each pass into still-wet paint, and don’t let any strip flash off before you reconnect it. Work in small sections—one to two panels at a time—then immediately lay off in one direction to prevent lap marks.
Paint Top-To-Bottom
Once your primer has cured and you’ve masked off hardware and trim, apply the topcoat from the top panel down so gravity and lap marks don’t work against you. Start with the uppermost recessed panel: cut in edges with a quality angled sash brush, then immediately fill the field with a 3/8-inch nap roller. Move to the adjacent stile and rail sections, keeping your sequence consistent so color coordination stays uniform across panels. Reload often and apply steady pressure to level the film without overworking it. Next, repeat the same pattern on each lower panel: edges first, then flats, then framing members. Finish by coating vertical sides and the bottom rail last, where drips collect. This order improves coverage control and supports paint durability on high-wear edges.
Maintain A Wet Edge
After you’ve established a top-to-bottom sequence, keep each section wet as you work so the new paint can blend into the previous pass before it skins over. Load your brush or roller consistently, then overlap the fresh stroke into the still-glossy edge by 1–2 inches. Maintain steady pressure and a uniform film thickness; thin spots flash dry and telegraph lap lines. Don’t back-brush once the surface turns tacky—feather only while it’s wet. Keep your paint tray covered between reloads and work out of the shade to slow dry time. If you pause, stop on a natural break like a stile, not mid-panel. A wet edge also supports color matching, preventing darker overlaps, and improves paint durability by avoiding weak, overworked ridges.
Work In Small Sections
Because metal paint flashes off quickly, you’ll get cleaner coverage if you break the door into small, repeatable sections and finish each one in a single pass. Start at the top panel and work left-to-right, then move down panel by panel. Load your brush or mini-roller evenly, lay paint on fast, and immediately tip it off in one direction to level film. Keep a wet edge by overlapping the previous section 1–2 inches before it skins over. Stop only at panel breaks, not mid-rail. For Garage door safety, lock the door open, unplug the opener, and keep fingers clear of hinges while you lean in. Confirm paint color selection in full sun before you commit to the full door.
Frequently Asked Questions
How Long Should I Wait Before Closing the Garage Door After Painting?
Wait at least 24 hours before closing; extend to 48 in cool, humid conditions. Check paint drying time: touch-dry in 2–6 hours. Follow door opening delay: test tackiness, confirm hard cure, then close.
Can I Paint Over an Existing Powder-Coated or Factory-Baked Finish?
Yes, you can paint over powder-coated or baked finishes if they’re sound. Clean, degrease, scuff-sand, and spot prime. Do paint removal on peeling areas, apply rust treatment to bare metal, then topcoat.
What’s the Best Way to Prevent the Painted Door From Sticking to Weatherstripping?
Apply Weatherstripping protection: mask seals with painter’s tape or rub silicone wax. Let paint fully cure, then dust seals with talc. Use Paint adhesion tips: keep coats thin, avoid edges, cut in carefully.
How Do I Maintain the Finish and Clean the Door Without Dulling It?
Maintain the finish by washing gently: 1) Rinse dust. 2) Wipe with pH-neutral soap and microfiber. 3) Rinse, dry immediately. 4) Avoid abrasives/solvents. This Surface maintenance preserves gloss and maximizes Paint durability.
How Often Should a Metal Garage Door Be Repainted in Harsh Climates?
In harsh climates, you’ll repaint every 5–8 years. Step 1: assess chalking, rust, fading annually. Step 2: prioritize paint durability with exterior-grade enamel. Step 3: optimize color selection; lighter colors reduce heat stress.
Conclusion
Now that you’ve masked, degreased, repaired, sanded, and primed, you’re ready for the “simple” part: painting without brush marks. Pick calm, dry weather, then load a quality roller and cut in quickly. Start at the top panel, work down, and keep a wet edge—don’t stop mid-stile. Back-roll lightly, don’t overwork, and maintain consistent pressure. When it dries, the irony lands: you did all that so the finish looks effortless.