Isolate power at the spur/breaker, lock off if you can, and prove dead with a CAT-rated meter before you open anything. Confirm the switch/timer closes the control circuit, then check the backdraft damper and exterior grille for sticking or blockage. Clean or replace grease/carbon filters and reseat them without gaps. Inspect ducting for crushed flex or grease buildup and reseal joints with foil tape. If the motor hums, overheats, or trips, test the capacitor and consider replacement. Keep going for deeper, step-by-step checks.
Key Takeaways
- Confirm power and controls: reset breaker, check isolator voltage, and verify switch/timer/sensor closes the circuit safely.
- Restore airflow by freeing the backdraft damper and clearing blocked exterior grilles, nests, lint, or grease buildup.
- Clean or replace filters: degrease metal meshes, replace saturated carbon filters, and refit seals tightly to prevent bypass and odours.
- Inspect and clean ducting: remove grease, fix crushed flex, reseal joints with aluminium tape, and minimise bends or undersized runs.
- Diagnose motor issues: spin-test for binding, check capacitor and overheating, tighten wiring terminals, and replace worn bearings or motor if necessary.
Kitchen Extractor Fan Troubleshooting: 5 Quick Checks
Before you dismantle anything, run five quick, low-risk checks that align with safe electrical practice and help you pinpoint whether the fault is power supply, controls, airflow restriction, or the fan motor itself. First, verify supply: reset the breaker, confirm the isolator is on, and test voltage with a CAT-rated meter; lockout/tagout if you can. Second, check the control path: confirm the switch, timer, or humidity sensor actually closes the circuit. Third, inspect airflow: ensure the backdraft damper moves freely and the exterior grille isn’t blocked. Fourth, listen for Fan noise indicating loose fasteners, misaligned housing, or a vibrating duct; apply installation tips like adding anti-vibration mounts. Fifth, spin-test the impeller for binding, then check start/run capacitor and motor overheating.
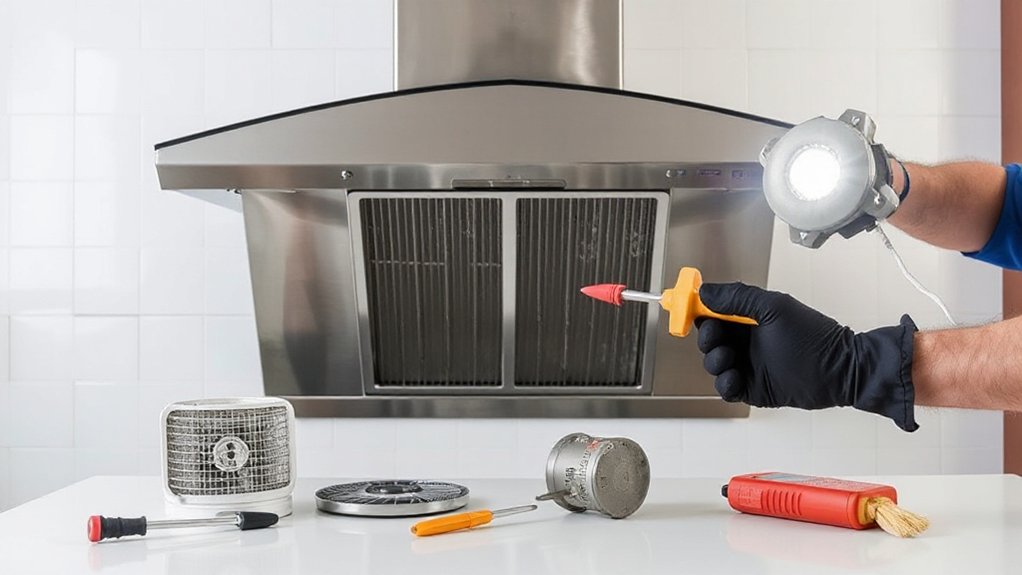
Clean or Replace Kitchen Extractor Fan Filters
Although a faulty fan motor can mimic poor performance, clogged or damaged filters are often the real cause of low airflow and grease-laden ducting, so treat filter service as a primary safety and ventilation control. Isolate power at the spur, then remove metal mesh or baffle filters and inspect for deformation, broken welds, or heavy varnish. For Filter maintenance, degrease in hot water with an alkaline cleaner, rinse, dry fully, and refit without gaps to prevent grease bypass. Replace disposable carbon filters to the maker’s interval; saturated media increases fire load and odour carryover. Confirm the filter frame seals and latches meet manufacturer instructions and local ventilation requirements. If the filter housing is cracked, warped, or unavailable, plan Fan replacement rather than improvised fixes. Recheck airflow after service.
Clear Blocked Ducting and Improve Airflow
Where’s the restriction—at the hood spigot, the duct run, or the external grille? Isolate the section by inspecting for grease buildup, crushed flex, sharp bends, or backdraft damper fouling. Switch off the fan and let surfaces cool; wear cut-resistant gloves and eye protection. Remove the ducting where accessible, then degrease and brush through to bare metal, capturing residues to prevent slip hazards. Replace torn foil tape and reseal joints with listed aluminium tape or mastic; don’t use cloth “duct tape.” For Airflow optimization, shorten runs, minimize elbows, and upsize to the manufacturer’s specified diameter. Check the outside grille for lint, nests, and stuck louvers. Schedule periodic duct maintenance to meet ventilation performance expectations and fire-risk controls.
Check Extractor Fan Wiring, Switch, and Connections
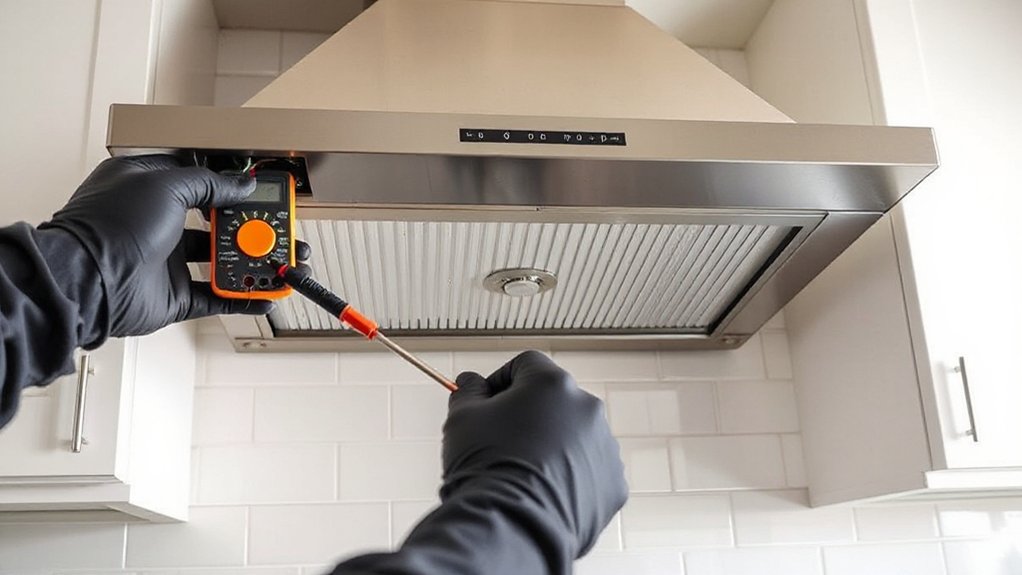
Once you’ve confirmed the ducting’s clear, verify the extractor fan’s electrical supply path—from the isolator or breaker to the wall switch and the fan terminals—because loose, overheated, or miswired connections can cause intermittent running, low speed, or total failure. Isolate power, lock off if possible, and prove dead with a tester before opening covers. Check that the correct protective device and cable size are used, and that earth continuity is intact. Tighten terminals to manufacturer torque, replace heat-darkened connectors, and guarantee no copper is exposed outside clamps. Test the switch for firm operation and correct continuity. Poor connections can create arcing that increases Fan noise and trips protection. Restore power and confirm stable start-up and consistent speed, with no hot smell present.
Motor Failing? Repair vs Replace Your Extractor Fan
If your extractor fan hums, stalls, overheats, or trips the protective device, treat the motor as the primary suspect and decide quickly whether repair makes sense or replacement gives you a safer, compliant outcome. Isolate the circuit, verify dead, and inspect for seized bearings, heat-discoloured windings, and capacitor bulging. Excessive Fan noise often indicates bearing wear or rotor rub; lubrication rarely restores sealed units. If you can source OEM parts and the housing, impeller, and wiring pass inspection, you may replace a run capacitor or clean grease loading, then test current draw against the nameplate. Choose Motor replacement when insulation breakdown, burnt smell, repeated tripping, or high temperature rise appears. After work, confirm airflow, earth continuity, and RCD/MCB operation. Refit guards and verify clearances.
Frequently Asked Questions
Do I Need Building Regulations Approval to Replace an Extractor Fan?
You usually don’t need Building Regulations approval to replace an existing extractor fan like-for-like, but you must meet ventilation and electrical standards. You may need planning permission or a building permit if ducting or openings change.
What Extractor Fan Size Is Best for My Kitchen’s Room Volume?
You’ll want a fan rated to deliver 10–15 air changes per hour: multiply your kitchen volume by 10–15 to get required m³/h. For Fan installation, follow manufacturer guidance and verify Ventilation efficiency using commissioning tests.
Are Inline Extractor Fans Quieter Than Hood-Mounted Models?
Yes—inline fans usually run quieter than hood-mounted models; shockingly, moving the motor away helps. For noise comparison, check sone/dB ratings. For installation considerations, use rigid ducts, isolate mounts, meet IEC/UL grounding, and fit backdraft dampers.
How Can I Reduce Extractor Fan Noise and Vibration Long-Term?
You’ll reduce noise and vibration long-term by balancing the impeller, tightening mounts, adding vibration isolators, and using rigid duct supports. Follow manufacturer specs and electrical codes, schedule fan maintenance, and guarantee airflow for noise reduction.
Should I Vent Outside or Use Recirculation With a Charcoal Filter?
Vent outside if you can—you might worry about installation complexity, but it maximizes Ventilation efficiency and protects Indoor air quality by exhausting moisture and combustion byproducts. Use charcoal recirculation only where ducting can’t meet code clearance.
Conclusion
Funny coincidence: the day you finally notice lingering cooking smells is often the day your extractor fan’s safety margin has already slipped. If you’ve checked filters, ducting, wiring, and the switch, don’t ignore abnormal noise, heat, or vibration. You’ll keep ventilation compliant by isolating power at the breaker, confirming earth continuity, and replacing damaged components to manufacturer spec. If the motor’s failing, you’re usually safer—and more economical—replacing the unit.