Upgrade your ceiling by matching the finish to each room’s demands and your budget: moisture-resistant paint, PVC panels, or sealed wood in kitchens and baths; fabric-wrapped or micro-perf drywall for quieter bedrooms; smooth drywall, tongue-and-groove, or coffers for living-room impact. Prep first—spot repairs, sand, clean, and prime to prevent flashing and stains. Plan reveals, access panels, and concealed fasteners, then align lighting and acoustic modules for a seamless grid. Keep going for layout tips and finish comparisons.
Key Takeaways
- Choose ceiling finishes by room use: moisture-stable panels or paint for baths; acoustic panels for bedrooms; statement drywall or wood details for living rooms.
- Compare costs early: painted drywall is budget-friendly, wood or MDF details are mid-range, and acoustic or metal ceiling systems are premium upgrades.
- Prep surfaces thoroughly: repair seams, sand smooth, clean dust and grease, and prime to prevent stains and ensure consistent topcoat adhesion.
- Add modern architectural detail with trays, coffers, shadow gaps, or reveal beads, keeping lines level and modules balanced for clean geometry.
- Coordinate lighting and access: align grids to focal axes, conceal fasteners, plan fixture cutouts, and use dead-matte or soft eggshell to reduce glare.
Choose Modern Ceiling Finishes by Room and Budget
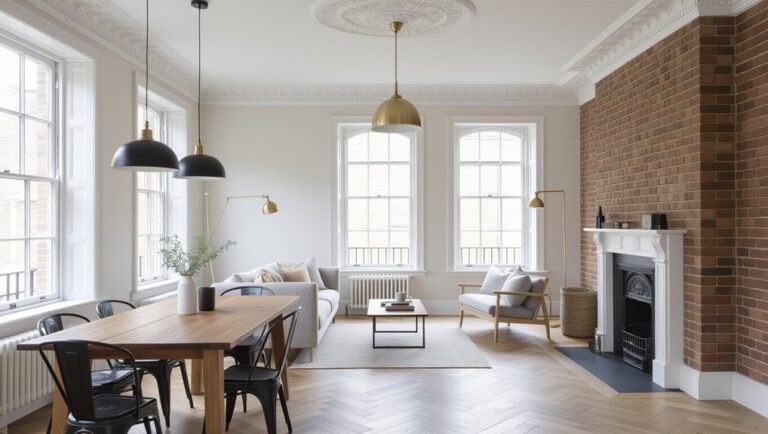
Where should you start when you’re choosing a modern ceiling finish—your room’s function or your budget? Start with function, then confirm the numbers. In kitchens and baths, you’ll want moisture-resistant paint, PVC panels, or sealed wood slats. In bedrooms, you can prioritize softness and acoustics with fabric-wrapped panels or subtle micro-perforated drywall. In living rooms, statement looks like tongue-and-groove planks, coffered kits, or smooth Level 5 drywall deliver clean lines under layered lighting.
Review Ceiling material options through a clear Cost comparison: painted drywall stays entry-level, wood and MDF details land mid-range, and acoustic systems or metal ceilings trend premium. You’ll align finish, durability, and visual impact with how you use the space daily.
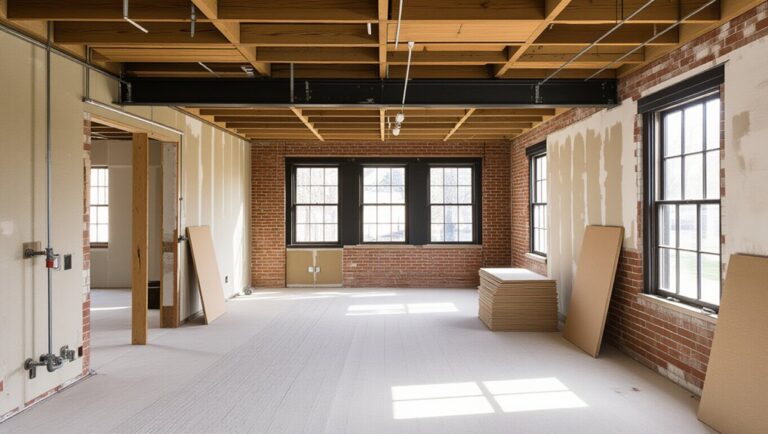
Prep the Ceiling Surface for Any Finish
Before you commit to paint, slats, panels, or coffers, prep your ceiling like it’s the finish itself—because every ripple, crack, and stain will telegraph through the final look. Start with a bright work light and scan for nail pops, tape seams, and water marks, then fix issues before you hide them. Scrape loose texture, sand high spots, and feather patch edges so progressions disappear from eye level. Wash off dust, grease, and smoke film; your finish won’t bond to grime. For ceiling surface preparation, spot-prime repairs and stains first, then choose the right primer for the substrate—drywall, plaster, or previously painted surfaces. During primer application, cut in cleanly, roll consistently, and maintain a wet edge to avoid lap lines. Let it cure fully.
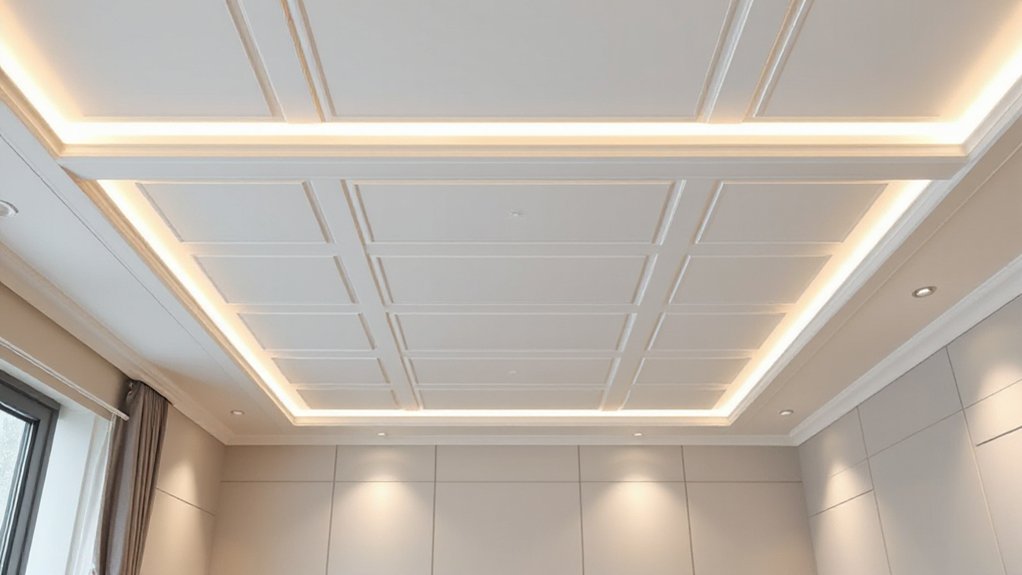
Create Modern Drywall Ceiling Details (Tray, Coffer, Reveal)
Once your surface is prepped, you can elevate the room by framing a tray ceiling with clean step-downs, consistent drops, and blocking placed where lighting and trim will land. If you’re building coffers, you’ll get the sharpest look by snapping a true centerline, balancing the grid to the walls, and keeping bay sizes consistent to avoid skinny border panels. For a modern reveal edge, you’ll specify the bead profile, hold a precise shadow gap, and run straight, continuous lines so the detail reads crisp from every angle.
Tray Ceiling Framing Basics
Although a tray ceiling looks like a simple “step-up” in drywall, the framing behind it has to do the heavy lifting—setting crisp elevations, straight lines, and clean shifts that won’t telegraph waves or cracks later. You start by confirming joist direction, then establish the tray perimeter with level lines and a laser so every drop reads intentional. Build the soffit ladder with straight, kiln-dried lumber or metal track, keep spans tight, and block at corners for dead-square returns. You’ll add continuous backing where drywall edges land, especially at the inside verticals, so fasteners bite cleanly. If you’re integrating lighting or HVAC, you plan chases now to protect sightlines. Done right, tray framing elevates ceiling architecture without compromising the finish.
Coffer Grid Layout Tips
When you treat a coffer ceiling like a measured grid—not a series of boxes—you’ll get the clean, modern rhythm clients expect. Start by snapping centerlines off the room’s true axis, then balance the perimeter so border coffers match and light locations land symmetrically. Keep module sizes practical for drywall: repeatable bays reduce seams and speed finishing. Align coffers with doors, windows, and major furniture zones so the ceiling supports the plan.
Plan Ceiling acoustics early: vary bay depth or add absorptive panels in select cells to control echo without changing the look. Build in Ventilation considerations by reserving “service” coffers for diffusers, returns, and access, keeping grilles centered and consistent. Confirm joist conflicts before you commit.
Reveal Edge Detailing
How do you make a tray or coffer ceiling read crisp and contemporary instead of bulky? You specify a reveal: a clean shadow gap that separates planes and eliminates heavy trim lines. Keep the reveal consistent—typically 1/2 to 3/4 inch—and align it with your coffer grid so every intersection looks intentional. Use metal reveal beads for straightness, then skim-coat and sand to a level-5 finish so light grazes the edge without waviness.
Treat edge detailing like jewelry: minimal, precise, and repeated. At the perimeter, skip traditional ceiling crown molding and instead return drywall to a crisp corner, or pair a small, square-profile trim with a reveal for a tailored frame. Prime, then use matte paint to preserve the shadow line.
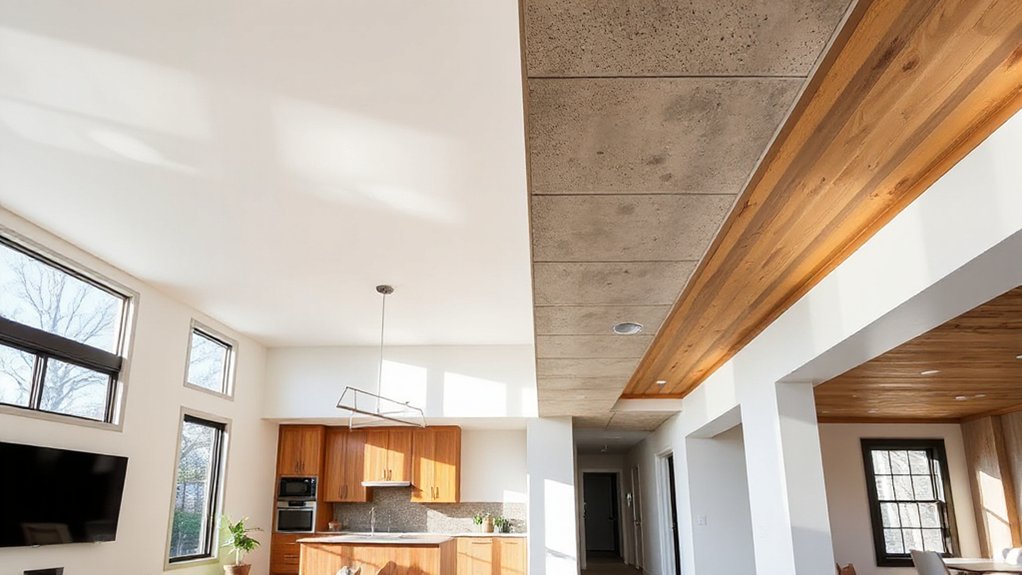
Add Warmth With Wood Slat Ceiling Finishes
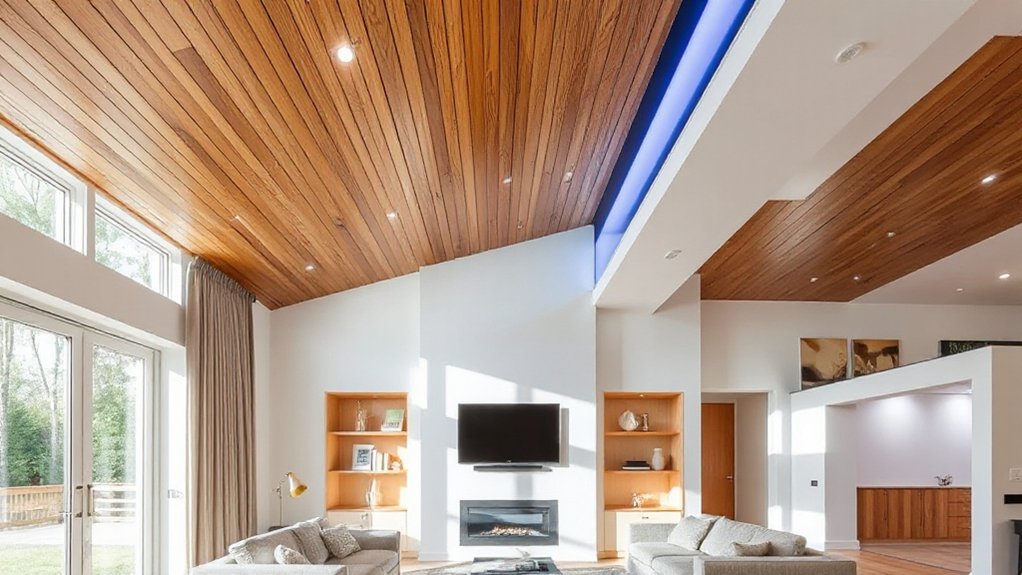
If you want a ceiling that feels richer and more inviting, you can’t beat the natural texture and depth of wood slats. You’ll control the look by choosing an installation style—full-coverage field, framed feature zone, or directional runs that guide sightlines. You’ll also fine-tune the finish with slat width and spacing, from tight, tailored rhythms to wider gaps that emphasize shadow and contrast.
Natural Texture And Depth
Although paint and drywall can look crisp, they rarely add the tactile warmth that makes a room feel finished. With wood slat ceiling finishes, you introduce natural grain, subtle shadowing, and Textural contrast that elevates everything below—upholstery, stone, even matte cabinetry. You’ll notice how the ceiling stops feeling like a blank plane and starts acting like a designed surface, guiding the eye and softening hard edges. Choose species and stain tones that echo your flooring or millwork, and you’ll get cohesion without matching too closely. For client-ready performance, prioritize sealed, stable boards and proven finishes; Material durability matters when humidity, HVAC swings, and daily living test surfaces. The result feels layered, tailored, and quietly luxurious.
Installation Styles And Spacing
When you plan a wood slat ceiling, the installation style and spacing do most of the visual heavy lifting, controlling rhythm, shadow lines, and how expansive the room feels. Align slats with the room’s long axis to elongate sightlines, or run them perpendicular to make a wide space feel more intimate. Adjust spacing to your Ceiling height: tighter gaps read refined and help lower visual scale, while wider reveals emphasize depth and modern contrast. Choose flush-mounted slats for a clean plane, or add battens on furring strips to create a floating effect and conceal wiring. For Acoustic considerations, pair slats with black acoustic felt and mineral wool above; a 10–20 mm reveal typically balances absorption with a tailored look. Match end details to trim.
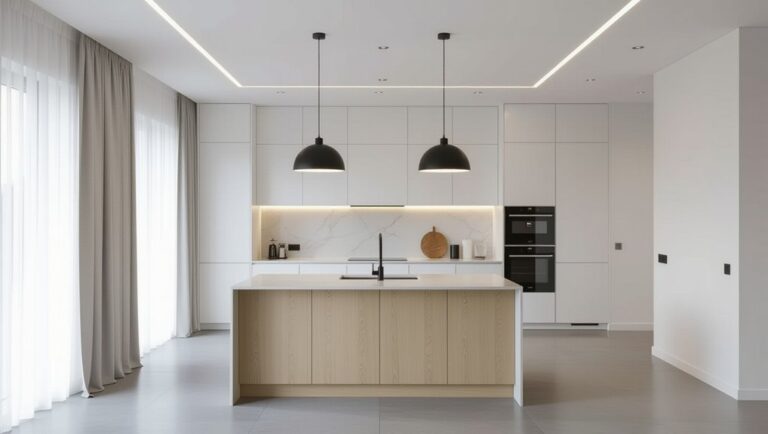
Install Decorative Ceiling Panels and Modern Tiles
How do you give a plain ceiling instant architectural presence without a full rebuild? Install decorative ceiling panels or modern tiles that read like custom millwork. You’ll choose from PVC, MDF, wood veneer, or pressed metal, then align the grid to your room’s focal axis so seams disappear. Use concealed fasteners and adhesive rated for overhead loads, and plan access panels around sprinklers, speakers, and junction boxes. If you want Ceiling art, specify patterned tiles with crisp relief; frame them with decorative moldings for a tailored border that matches your casing profile. In kitchens or baths, pick moisture-stable panels and corrosion-resistant trims. For low ceilings, use thin-profile tiles and a tight reveal to keep the plane clean, modern, and upscale.
Refresh Modern Ceiling Finishes With Paint or Metallic Sheen
Even if you don’t touch the framing, you can transform a flat, builder-grade ceiling by treating it like a finish surface—not an afterthought—with the right paint system or a controlled metallic sheen. Start by repairing seams and skim-coating divots, then sand to a uniform tooth so your topcoat reads intentional, not patchy. Prime for stain lock and adhesion, especially over old flat paint.
For Ceiling paint techniques, choose a dead-matte for modern calm, or a soft eggshell when you want subtle wipeability without spotlighting flaws. Cut crisp lines at crown and corners, then roll in one direction, keeping a wet edge to avoid lap marks. If you’re after Metallic sheen options, test swatches at different times of day, and apply thin, even coats for a refined glow.
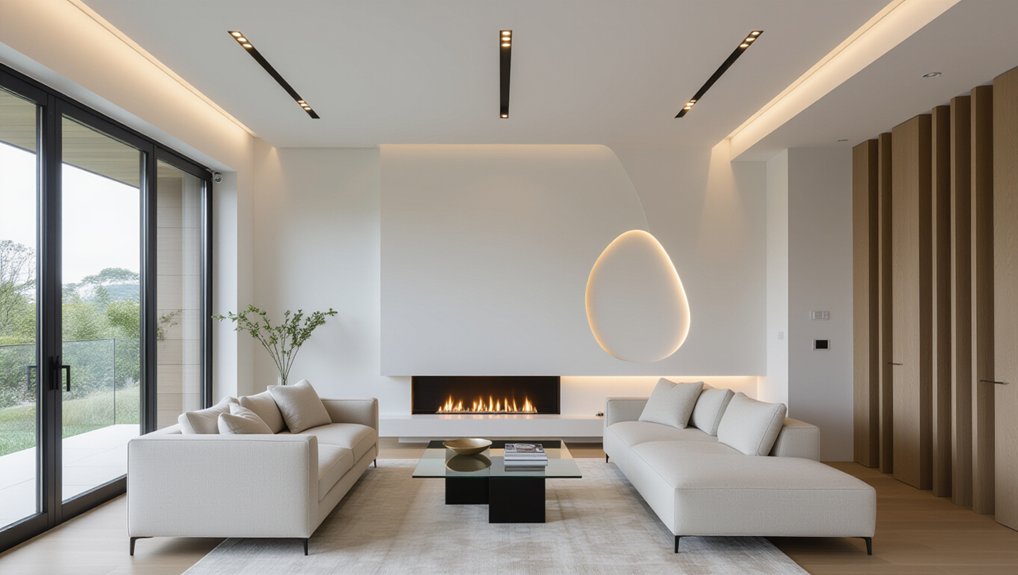
Integrate Lighting and Acoustics Into Your Ceiling Finish
Because the ceiling sits at the intersection of light bounce and sound reflection, you’ll get a more polished result if you design the finish around your fixtures and your room’s acoustics—not the other way around. Start by mapping fixture locations, beam spacing, and sightlines so trims, reveals, and seams land cleanly. Use recessed channels or slim surface tracks to layer ambient lighting, task light, and accent light without visual clutter. Choose a finish sheen that complements your LEDs and minimizes glare on screens. If the room echoes, specify acoustic panels or slatted systems with backing felt, then align their modules with lighting runs for a tailored grid. You’ll improve comfort, reduce noise, and make the ceiling read intentional—not patched together.
Frequently Asked Questions
How Do Modern Ceiling Finishes Affect Home Resale Value?
Modern ceiling finishes can boost your home’s resale value by signaling quality and contemporary taste. You’ll maximize returns with smart ceiling material choices and strong aesthetic impact that photograph well, feel cohesive, and reduce perceived renovation needs.
Do I Need Permits or HOA Approval to Change a Ceiling Finish?
Like tailoring a suit, you may need permits and HOA approval. You’ll check Building codes and local Permit requirements, especially for structural, electrical, or fire-rated changes. You’ll confirm HOA rules before contracting and scheduling inspections.
What Modern Ceiling Options Work Best for Low-Ceiling Rooms?
You’ll get the best results with smooth drywall, a subtle micro-texture, or shallow beams, keeping profiles thin. Add recessed Lighting enhancements and strategic Color palette choices like bright matte whites to visually lift height.
How Long Does a Typical Ceiling Upgrade Take From Start to Finish?
You’ll typically finish a ceiling upgrade in 2–5 days; simpler Ceiling texture jobs take 1–2. Add lighting integration, framing, and paint-curing time, and you’re closer to a week, with inspections.
What Are the Safest Ceiling Finishes for Households With Allergies?
Even if you worry “safe” means boring, you’ll love low-VOC paint, sealed plaster, and smooth drywall. Choose Allergy friendly materials and Hypoallergenic finishes, avoid textured popcorn, and specify mold-resistant primers plus washable topcoats.
Conclusion
When you upgrade your ceilings with modern finishes, you’re not just covering drywall—you’re curating the room’s “fifth wall.” After one client swapped a flat white lid for a slim reveal detail, warm wood slats, and dimmable LEDs, guests stopped mid-conversation and looked up; that’s when we knew it worked. With paint revitalizing for under $100 or panels for a bigger leap, you can match every room’s budget, acoustics, and mood—clean, tailored, and current.