First, confirm the drip comes from a joint, not overflow or a pinhole, by inspecting seams and running a low-flow hose from uphill to downhill. Mark the first wet spot, then scoop out water and scrub the joint with a stiff nylon brush. Dry it completely. Scrape off failed sealant with a plastic tool, wipe residue, and apply a continuous bead of gutter-rated sealant (inside first), smoothing it tight. Water-test again to guarantee it’s sealed. More joint fixes and prevention tips follow.
Key Takeaways
- Confirm the drip comes from a joint, using a dry inspection and a low-flow hose test from uphill to downhill.
- Clean the joint thoroughly and dry it completely; scrub with a nylon brush and remove debris from overlaps, screws, and lips.
- Remove failing sealant with a plastic scraper, wipe residue with mineral spirits, and ensure surfaces are compatible and ready to bond.
- Apply gutter-rated sealant inside the seam with a continuous bead, then add a thin exterior bead and smooth it.
- Reinforce weak joints with butyl-backed gutter tape or a mending plate, then tighten or replace corroded fasteners and check alignment.
Confirm the Leak Is Coming From a Gutter Joint
Before you seal anything, make sure the drip is actually coming from a gutter joint and not a pinhole, end cap, or overflowing section. Set your ladder on firm ground, keep three points of contact, and wear gloves and eye protection. For Leak detection, start dry: look for separated seams, missing fasteners, cracked sealant, or rust trails that begin at a splice. Then run a controlled hose test uphill to downhill, adding water in short intervals so you can pinpoint the first wet line. Mark the suspect joint with tape or a marker. Note your Gutter material (aluminum, vinyl, steel) and joint type (slip connector, riveted splice) so you can choose compatible sealant later. Also check for sagging that mimics a seam leak.
When a Joint Repair Won’t Be Enough (Replace Instead)
If you see seam corrosion, soft rot, or flaking metal at the joint, a patch won’t hold and you should replace that section before it fails. If the joint keeps pulling apart even after you’ve cleaned, sealed, and re-fastened it, stop forcing a repair and plan a replacement when the gutter’s dry and you’re on a stable ladder. If you’re chasing multiple leaks along a run, treat it as a system problem and replace the damaged length instead of sealing one joint at a time.
Seam Corrosion Or Rot
Although sealant and fasteners can stop many joint leaks, seam corrosion or rot means the gutter metal itself has failed, so you’re better off replacing the damaged section than patching it. Look for pitting, flaking, pinholes, soft spots, or staining that returns soon after cleaning. Probe gently with a screwdriver; if the metal flexes, crumbles, or you punch through, don’t waste time on caulk.
Work from a stable ladder on firm ground, wear cut-resistant gloves and eye protection, and keep hands clear of sharp edges. Remove the compromised length back to solid metal, then install a matching replacement with proper hangers and a sealed, riveted overlap. For rot prevention, clear debris, flush gutters, and repaint bare metal to slow future seam corrosion.
Persistent Joint Separation
Why does that “fixed” gutter joint keep pulling apart? Persistent joint separation usually means movement, not just a bad seal. If the hangers are loose, the fascia is rotted, or the downspout drop is tugging, the joint flexes and breaks the bond every rain and freeze. You can’t caulk your way out of structural stress.
Get on a stable ladder, wear gloves and eye protection, and check gutter alignment with a level and a string line. If the sections won’t sit flush, the metal is warped, the bead is stretched, or the joint is out of square. When you see repeated gaps after re-fastening, replace the affected section and connector, and add properly spaced hangers to stop the pull.
Multiple Leaks Along Runs
Once you start chasing pinholes and hairline cracks all along a gutter run, a single joint repair won’t hold because the metal (or vinyl) has likely thinned, split, or warped beyond spot-fixing. If you see leaks every few feet, staining beneath the trough, or seam sealant peeling in multiple places, plan on replacement. Patchwork often fails after the next freeze-thaw cycle, and water will keep reaching fascia and soffit.
Work safely: set a stable ladder on level ground, wear gloves and eye protection, and avoid working in rain. During Gutter maintenance, flush the run and inspect for widespread corrosion, sagging hangers, and soft decking. For Leak prevention, replace the affected length (or upgrade to seamless) and re-pitch to proper slope.
Choose the Best Sealant for Gutter Joints (By Material)
Before you squeeze out any caulk, match the sealant to your gutter material and the conditions at the joint—doing so prevents early failure, especially at seams that flex with temperature swings. For aluminum and galvanized steel, choose a high-quality polyurethane or butyl rubber gutter sealant; both handle movement and resist UV, boosting Sealant longevity. For copper gutters, avoid acidic cure silicones that can discolor metal; use a neutral-cure silicone or polyurethane rated for copper to guarantee Material compatibility. For vinyl/PVC, pick a sealant labeled for plastics and outdoor exposure, often a urethane or specialized silicone, so it won’t peel as the plastic expands. Check the label for “wet surface” or “below-freezing application” only if your joint conditions demand it. Avoid asphalt roof cement; it cracks quickly.
Tools and Supplies for Gutter Joint Repair
Before you reseal a leaking gutter joint, gather essential hand tools like a caulk gun, stiff brush, putty knife, and tin snips so you can clean, prep, and tighten the seam properly. Keep the right sealants and adhesives on hand—plus rags and a compatible cleaner—so you can remove old material and lay a continuous, watertight bead. Set up your ladder on firm, level ground and wear gloves and eye protection, because you’ll be working at height and handling sharp metal edges and chemicals.
Essential Hand Tools
Although gutter joint repairs don’t require a full workshop, you’ll get cleaner, longer-lasting results if you start with a few essential hand tools. Bring a sturdy extension ladder, ladder stabilizer, and work gloves, then add safety glasses to block grit during Gutter cleaning. Use a gutter scoop or small trowel to remove packed debris, and a stiff nylon brush to scrub joint seams without gouging metal. Keep a bucket and microfiber rags handy for wiping surfaces dry. A putty knife helps lift old residue, while a utility knife trims loose tape or frayed edges cleanly. For fastener checks, carry a 1/4-inch nut driver, Phillips screwdriver, and adjustable wrench. Finish with a tape measure and marker to plan precise Weatherproofing techniques.
Sealants And Adhesives
Once you’ve scraped, brushed, and dried the joint, the sealant you choose will determine whether the repair lasts through the next heavy rain. For most metal or vinyl gutters, use a high-quality gutter sealant labeled for wet-dry cycles and UV exposure; that’s key for Sealant longevity. Avoid generic caulk that shrinks or cracks.
Check Adhesive compatibility with your gutter material and any existing sealant. Butyl rubber or polyurethane typically bonds well to aluminum, galvanized steel, and vinyl, while silicone can fail if residue remains. If you’re joining seams, add gutter seam tape or a reinforcing patch under the sealant for movement control.
Apply a continuous bead, tool it tight into gaps, and respect cure times before testing with water.
Safety Gear And Setup
If you’re working off a ladder, treat your safety gear and setup as part of the repair—not an optional extra. Wear cut-resistant gloves, safety glasses, and non-slip shoes; gutter edges and old screws can slice fast. Use a tool belt or bucket-on-hook so you’re not juggling sealant, a brush, and fasteners. Follow Safety precautions by checking for wet rungs, wind, and overhead lines before you climb.
For ladder positioning, set the feet on firm, level ground, extend 3 feet past the eave, and keep the 4:1 angle (one foot out for every four feet up). Tie off the ladder if possible, and never overreach—move it instead. Keep a spotter nearby.
Clean Out Debris Around the Leaking Joint
Before you try to seal the leak, clear out every bit of gunk around the joint so the repair can actually bond. Start by positioning your ladder on level ground and keeping three points of contact. Scoop out packed leaves and shingle grit with a gutter scoop or gloved hand, working away from the joint so you don’t force debris into the seam. Flush the area with a gentle stream from a hose, then stop and inspect. Use a stiff nylon brush to scrub the joint edges and the underside lip; avoid wire brushes that can scratch the finish and change your gutter color. During seasonal maintenance, repeat this cleaning after heavy storms to prevent recurring clogs and corrosion.
Dry the Joint Fast (So Sealant Actually Sticks)
Scoop or sponge out any standing water at the joint, then wipe it dry so you’re not sealing over a puddle. Next, chase hidden moisture from seams and overlaps by letting the area air out or blotting again until it feels completely dry to the touch. Speed things up with gentle heat from a hair dryer or steady airflow from a fan, and keep cords and tools clear of wet surfaces for safety.
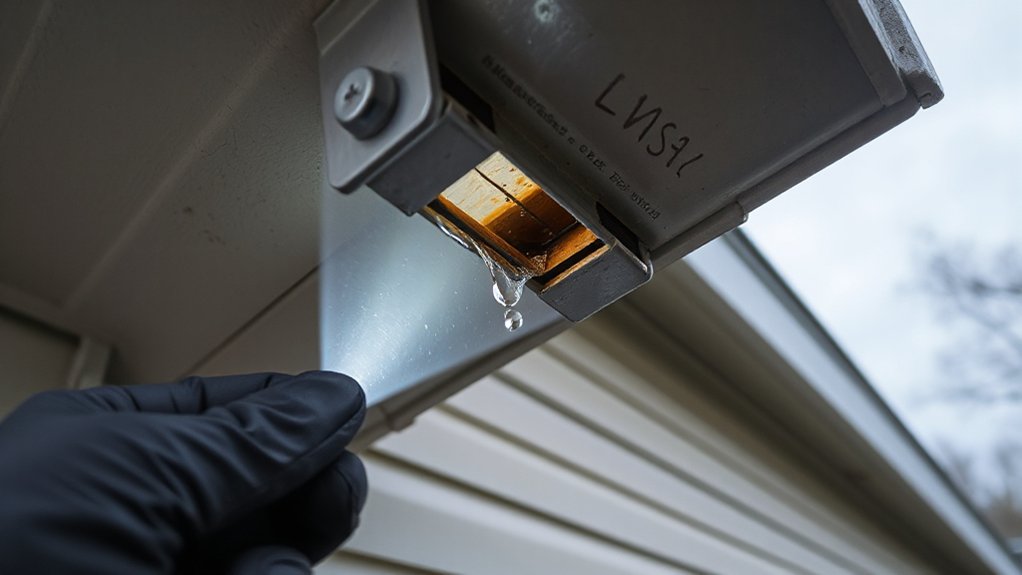
Remove Standing Water
Once you’ve found the leaking seam, get rid of any standing water right away so your sealant can bond instead of sliding off. Put on gloves and safety glasses, then set your ladder on firm, level ground and keep three points of contact. Scoop out pooled water with a small plastic cup, then dump it into a bucket instead of onto walkways. If the trough’s full, clear leaves and grit upstream so gutter drainage can move freely toward the downspout. Use a narrow trowel or gutter scoop to push water past the joint and toward the outlet. Don’t force water under shingles or behind fascia. Finish by wiping the channel clean so you’re not sealing over sludge. Check that your downspout isn’t clogged before you continue.
Evaporate Hidden Moisture
Even if the gutter looks dry, moisture often hides in the seam and under the lap, and it’ll keep sealant from grabbing. Before you seal, Evaporate hidden moisture by exposing the joint and giving it time to dry completely. Pull debris from the overlap, then wipe both surfaces with clean, lint-free rags until they come up dry. Pay attention to screw heads, rivets, and rolled edges where water lingers. If you see dark staining or soft sealant remnants, assume Moisture absorption has occurred and keep drying until the metal feels room-temperature and chalky, not cool or slick. Work on a stable ladder, wear gloves, and avoid leaning on the gutter while you dry it.
Use Heat Or Airflow
After you’ve wiped the lap and seam dry, use controlled heat or steady airflow to drive off the last moisture hiding in rolled edges, fasteners, and pinholes so your sealant bonds instead of peeling. For heat application, set a hair dryer or heat gun on low and keep it moving 6–10 inches away; you want warm metal, not scorching hot paint or softened vinyl. Never aim heat at dry leaves or shingle edges.
For airflow techniques, aim a small fan along the gutter run or use compressed air in short bursts to clear moisture from overlaps and screw heads. Work upwind so you don’t blow debris into your face. Wear safety glasses and gloves, and let the joint cool completely before applying sealant.
Remove Old Gutter Sealant Without Scratching Metal
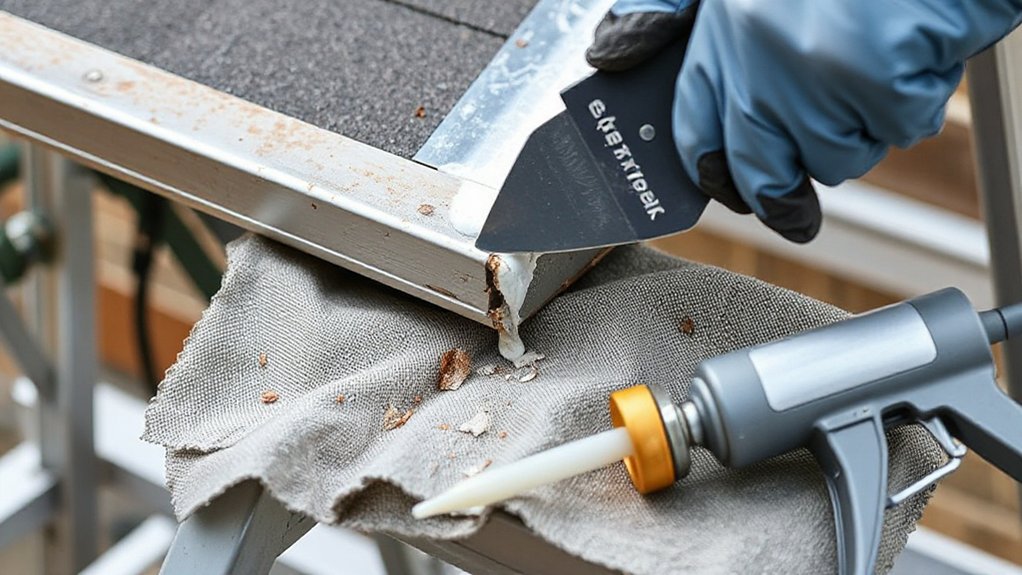
If you strip old gutter sealant the right way, you’ll protect the metal finish and get a clean surface that new sealant can actually bond to. Put on cut-resistant gloves and safety glasses, then stabilize your ladder on firm ground.
Start with a plastic putty knife or nylon scraper and work at a shallow angle, pushing away from your body. For stubborn beads, soften them with the heat or airflow you just used, then lift in small sections instead of prying. Avoid metal blades on painted aluminum or steel; match your approach to the gutter material. Wipe residue with a rag dampened with mineral spirits (or the sealant manufacturer’s remover), then rinse and dry. Check sealant compatibility before using any solvent so you don’t damage coatings or leave an oily film.
Realign and Rejoin the Gutter Seam for a Tight Fit
Check the seam for gaps, uneven overlap, or a lip that’s forcing water out, and keep your ladder stable before you put pressure on the gutter. Loosen the fasteners just enough to reposition the sections, then slide and square them so the edges meet evenly along the full joint. Re-secure the hangers or screws and press the seam tight so it won’t shift when water runs through.
Identify Seam Misalignment
Where’s that drip really coming from—right at the joint or a few inches downstream? Set up a stable ladder, wear gloves, and work on a dry day. Run water with a hose at low flow and watch the seam. If water slips through at the overlap, you’ve likely got seam misalignment. Look for a visible step between sections, a twisted end cap line, or a gap you can catch with a putty knife. Check the gutter line for gutter sag by sighting along the front lip; a dip can pull the joint out of plane and open the seal. Mark the exact leak point with painter’s tape so you don’t lose it when you shut off water.
Reposition Gutter Sections
Now that you’ve marked the exact spot where the seam leaks, you can realign the gutter sections so the overlap sits flat and seals properly. Set your ladder on firm, level ground and keep three points of contact while you work. Remove any Landscaping debris packed around the joint so nothing holds the metal apart.
Loosen the section just enough to move it by hand, then slide or nudge it until both edges match and the bottom channels line up. Check that the rear edge tucks tight against the fascia and the front lip stays even, with no twist. If old caulk or paint ridges from prior Gutter painting interfere, scrape them smooth so the mating surfaces sit flush. Recheck alignment by sighting along the run and feeling for steps at the seam.
Secure Tight Joint Fit
Once the overlap sits flush, lock the seam back together so it can’t creep apart under water flow or thermal expansion. With your ladder stabilized and gloves on, press the two sections firmly to confirm the lip nests fully. Reinstall or tighten hidden hangers near the joint so the gutter can’t sag and pry the seam open. If your system uses a slip-joint, crimp gently with seamer pliers; don’t crush the channel and restrict drainage. Replace missing rivets or screws with corrosion-resistant fasteners, then snug them until the metal won’t shift. Scrape away any flakes from joint corrosion and wipe clean so the fit stays true. This step supports long-term Gutter maintenance and prevents recurring leaks.
Tighten Hangers and Replace Missing Seam Screws/Rivets
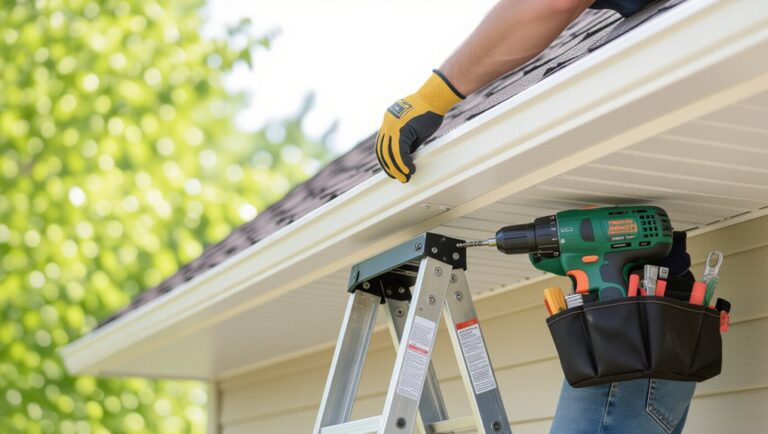
Because loose hardware often lets water sneak through seams and joints, start by checking every hanger and seam connection along the run. Set your ladder on firm ground, wear gloves and eye protection, and don’t overreach. With a nut driver or screwdriver, snug hidden hangers and strap hangers so the gutter lip stays tight to the fascia and the joint can’t flex. Inspect decorative brackets too; tighten their fasteners and confirm they’re not twisting the gutter out of alignment. Next, look for missing or corroded seam screws/rivets at corners, end caps, and splice plates. Replace them with matching stainless or coated hardware, sized to existing holes. Choose a finish that matches your gutter color to limit visible touchups later.
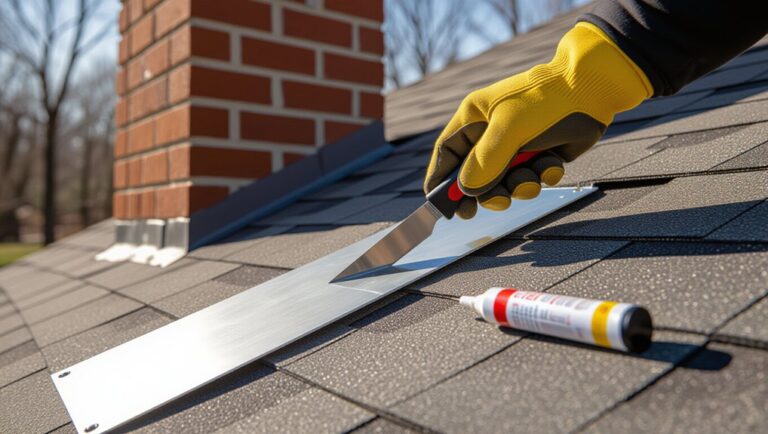
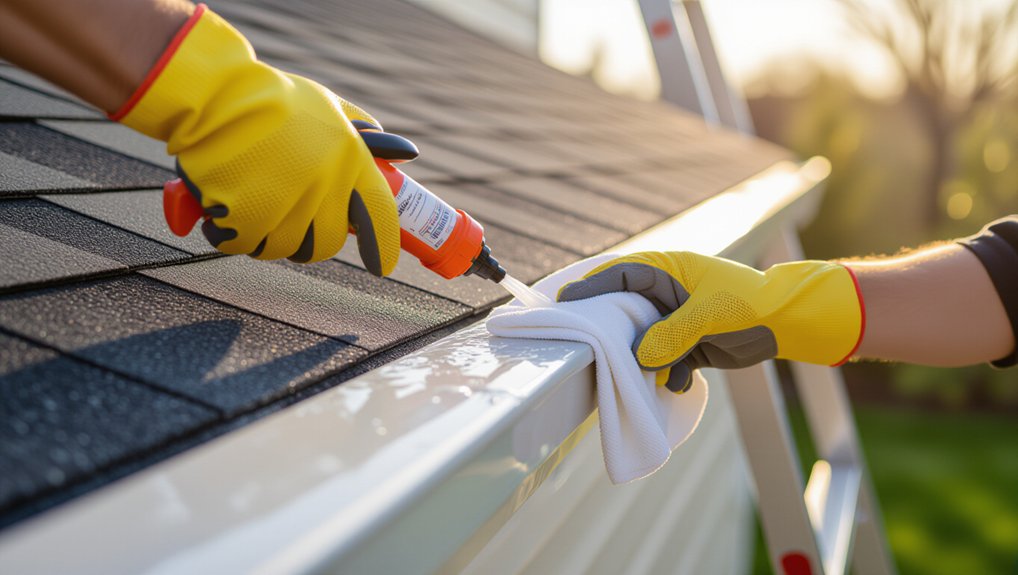
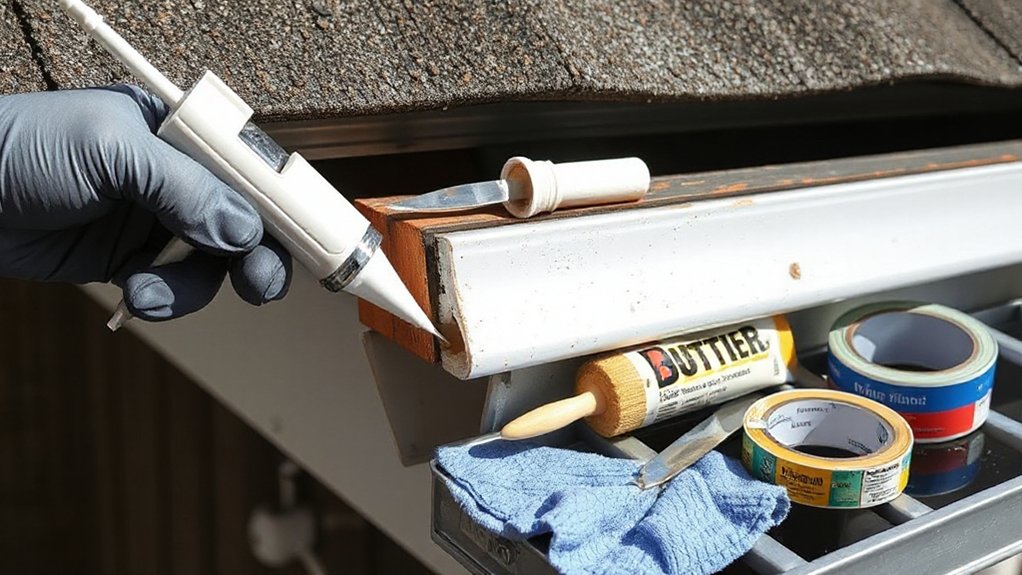
Apply Gutter Joint Sealant the Right Way (Inside/Out)
After you’ve confirmed the joints can’t move, seal them so water can’t wick through hairline gaps. Work on a dry day, wear gloves and eye protection, and use a stable ladder. Clean the seam inside the gutter with a brush and solvent, then dry it fully; wet metal ruins adhesion. Run a continuous bead of gutter-rated sealant along the joint from the inside first, pressing it into the lap with a gloved finger or plastic spoon. Don’t block the channel. Next, seal the exterior seam with a thinner bead to stop capillary leaks, smoothing it tight. Let it cure per label before adding gutter paint. Keep sealant off nearby gutter insulation or it may degrade.
Reinforce the Seam With Gutter Tape or a Strap
Even if your sealant bead looks perfect, you should reinforce a suspect joint so temperature swings and water weight don’t pry it open again. After Leak detection confirms the seam is the culprit, dry the area fully and wear gloves and eye protection.
For gutter tape, choose butyl-backed, exterior-rated tape. Center it over the joint on the inside of the gutter, press from the middle out, and roll it firmly to eliminate bubbles. For added strength, install a small aluminum strap or mending plate across the joint on the outside: predrill, use short stainless screws, and don’t overtighten. Add a thin sealant skim over fastener heads. Recheck alignment and slope. This reinforcement is smart Gutter maintenance that prevents repeat leaks without replacing sections.
Patch Pinholes at the Gutter Seam (Small Holes)
When you spot tiny pinholes right along a gutter seam, fix them before they widen and turn into a steady drip. Set your ladder on firm ground, wear gloves and eye protection, and clean the area with a stiff brush. Scrape away oxidation or old sealant, then wipe with mineral spirits and let it dry completely. Lightly sand the metal around the hole so your patch bonds well. Press a small piece of aluminum patch tape or a dab of gutter sealant over the pinhole, feathering the edges to prevent water lift. After it cures, apply thin weatherproof coatings for extra protection. Finish with gutter color matching touch-up paint so repairs blend in and you can easily inspect the seam later.
Reseal Leaking End Caps and Outlet Joints
Because end caps and downspout outlet joints sit at high-stress edges where water and debris collect, failed sealant there can leak fast and rot fascia before you notice. Set your ladder on firm ground, wear gloves and eye protection, and keep three points of contact. Scrape off loose sealant with a plastic putty knife, then wire-brush lightly and wipe clean; the metal must be dry. Re-seat a loose end cap or outlet flange with hand pressure, checking it’s fully seated. Apply a continuous bead of gutter sealant inside and outside the joint, tool it smooth, and don’t block the outlet opening. Choose sealant that matches your Gutter color for a cleaner repair. For installation tips, add a small overlap and fasten only through solid metal. Let cure.
Fix Corner Joints and Miters That Keep Opening Up
After you’ve sealed end caps and outlet joints, check the corners and miters next—these seams flex the most and can pull apart as hangers loosen or thermal expansion works the metal. For leak detection, look for dark streaks, mineral trails, or rust lines radiating from the seam. Set your ladder on firm ground, wear gloves, and avoid working near power lines.
Scrape out failed sealant and debris with a plastic putty knife, then wire-brush lightly and wipe dry. If the joint’s gapped, snug nearby hangers or add a hidden hanger to pull the corner tight. Refasten the miter with a short gutter screw or rivet, keeping fasteners above the water line. Apply a continuous bead of gutter sealant inside the corner and tool it smooth. This targeted gutter maintenance stops repeat openings.
Water-Test the Repair and Prevent Future Joint Leaks
Even if the seam looks sealed, you should water-test it right away to confirm the leak’s truly gone and to spot any pinholes before they stain siding or rot fascia. Set your ladder on level ground, wear gloves, and keep three points of contact. Run a hose at low flow for 5–10 minutes, starting upstream so water reaches the joint naturally. Check the underside with a flashlight and mark any drips for Leak diagnosis, then re-seal and retest. After it passes, prevent repeat failures with routine Gutter maintenance: clear debris, flush downspouts, and keep hangers tight so joints don’t flex. Don’t blast seams with high pressure; it can lift fresh sealant. Inspect after storms and temperature swings.
Frequently Asked Questions
Can I Repair Gutter Joint Leaks in Freezing or Rainy Weather?
You can, but you shouldn’t in freezing or rainy Weather conditions; sealants won’t bond and you’ll slip. Wait for dry, above-freezing temps, then clean, dry, and reseal. Follow Safety precautions: stable ladder, gloves, non-slip shoes.
How Long Should Gutter Sealant Cure Before the Next Rainfall?
You should let gutter sealant cure 24–48 hours before rain—coincidentally, storms love fresh repairs. Sealant types vary; check labels. Use proper application techniques: dry joints, clean surfaces, gloves, steady bead, no overtooling.
Will Gutter Joint Sealant Work on Painted or Coated Gutters?
Yes, gutter joint sealant can work on painted or coated gutters if you confirm paint compatibility and coating adhesion first. You’ll need to clean, lightly scuff, and dry surfaces; wear gloves; test a small spot.
Is It Safe to Repair Gutter Joints From a Ladder Alone?
You can, but it’s safest with a spotter; alone, only attempt it if you’re steady. As wind nudges the ladder, you check ladder safety, stage repair tools, keep three-point contact, and don’t overreach.
How Much Does a DIY Gutter Joint Repair Typically Cost?
You’ll typically spend $15–$60 for a DIY gutter joint repair; your cost estimate depends on sealant, screws, and patches. Use basic DIY tools you’ve got. Budget extra for gloves, eye protection, ladder stabilizer.
Conclusion
Once you’ve confirmed the leak is at the joint, you can stop drips fast with the right sealant, clean surfaces, and a solid patch or reseal. Wear gloves and eye protection, and keep your ladder stable—don’t rush. After curing, run a controlled hose test and watch every seam like a hawk. Clear debris regularly, check hangers, and touch up cracks early so a tiny gap doesn’t become a waterfall.