Transform your small kitchen by clearing counters, corralling daily items on a tray, and fixing the sink–stove–fridge workflow. Measure door swings, drawer pulls, and appliance clearances, then map zones for prep, cook, clean, and coffee so traffic stays at the perimeter. Run cabinets to the ceiling, swap awkward shelves for drawers and pull-outs, and add magnetic strips and over-sink boards. Bright, layered lighting and reflective finishes make it feel bigger—keep going for smarter layouts and storage.
Key Takeaways
- Declutter counters and corral daily essentials in trays or lidded boxes to reduce visual noise and free prep space.
- Measure door swings, clearances, and cabinet interiors, then map prep, cook, clean, and coffee zones to prevent bottlenecks.
- Maximize storage with ceiling-height uppers, drawers and pull-outs, and hidden zones like toe-kicks, corners, and cabinet doors.
- Choose compact, high-performance appliances and flat-storing accessories like roll-up racks, over-sink boards, and nesting bowls to save space.
- Brighten and expand the feel with layered lighting, warm light paint tones, and reflective finishes like glossy backsplash tile and pale quartz counters.
Start With the Quickest Space Wins
Three fast moves can make your small kitchen feel bigger before you spend a dollar: clear the counters, relocate rarely used items to higher or deeper storage, and tighten your layout around the sink–stove–fridge workflow. Next, edit what’s visible: corral oils, utensils, and mail into one tray or lidded box, and you’ll reduce visual noise instantly. Swap bulky decor for one purposeful piece, like a slim cutting board you actually use. Then tune what you see: choose calm color schemes with one light wall tone and one grounded accent to keep edges quiet. Finally, add Decorative lighting that pulls attention upward—an under-cabinet strip or a compact pendant—so the room reads taller and cleaner. You’ll feel more space, and you won’t lose function.
Measure Clearances, Storage, and Workflow
Before you buy a single organizer or cabinet insert, measure what you’re working with so every upgrade fits and your kitchen moves better. Tape out door swings, drawer pulls, and appliance clearances, then note pinch points around the sink, stove, and fridge. Record interior cabinet heights, widths, and depths, including hinges, pipes, and outlets, so pull-outs and stackers don’t bind. Map what you reach most and assign prime zones for prep tools, pans, and daily dishes; remeasure shelf spacing to eliminate wasted air. Don’t forget verticals: backsplash-to-cabinet gaps and toe-kick space can hide slim storage. Finally, document lighting locations for Lighting design and test Color schemes with samples under those bulbs for accurate, usable results.
Pick a Layout That Improves Traffic Flow
Once you know your clearances and pinch points, choose a layout that lets people pass through without cutting across prep and cooking zones. In a small kitchen, your goal is simple: keep movement at the perimeter and work in the center. Favor one-wall or galley plans when width is tight; they create direct routes and prevent crowding behind an open oven or dishwasher. If you can fit an L-shape, keep the inside corner clear and avoid placing seating where it forces detours. Align major doors—fridge, pantry, and patio entry—so they don’t clash. Map your Traffic patterns from entry to sink to exit, then place Layout zones to keep crossings minimal and steps predictable. Your kitchen will feel calmer and noticeably larger.
Add Zones for Prep, Cook, Clean, and Coffee
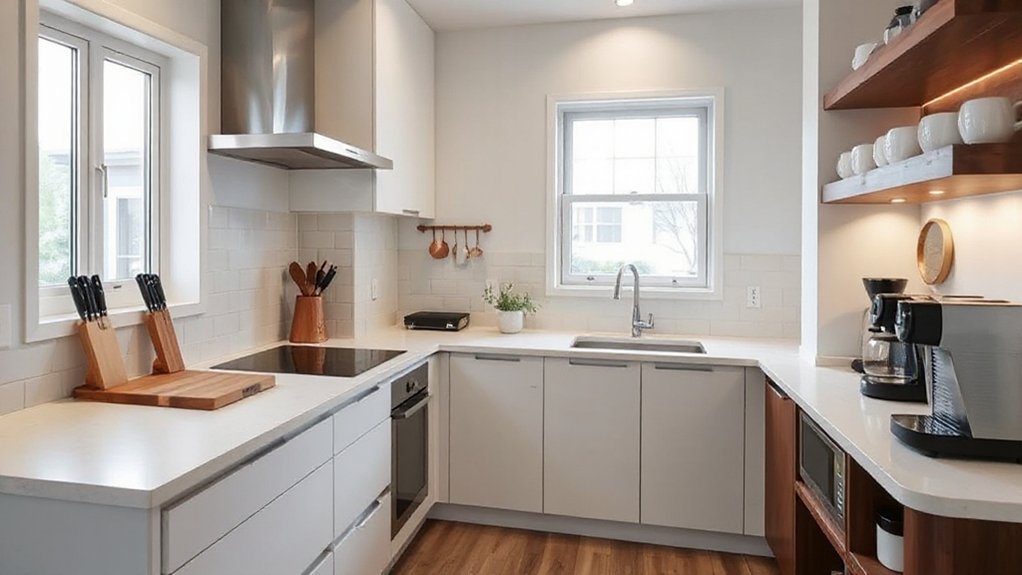
Although your kitchen may be small, you can make it work bigger by assigning clear zones for prep, cook, clean, and coffee so tasks don’t compete for the same inches. Set your prep zone beside the fridge with a slim pull-out board, knives, and mixing bowls within one step. Keep the cook zone tight to the range: oils, spices, and sheet pans stored vertically so you don’t shuffle stacks. Anchor the clean zone around the sink with a caddy, drying rack, and trash pullout to reduce drips and detours. Create a coffee zone on a narrow counter or cart with mugs, pods, and a water-fill pitcher. Use Smart lighting under shelves to cue each station, and add ergonomic seating at a tuck-in perch for quick breaks.
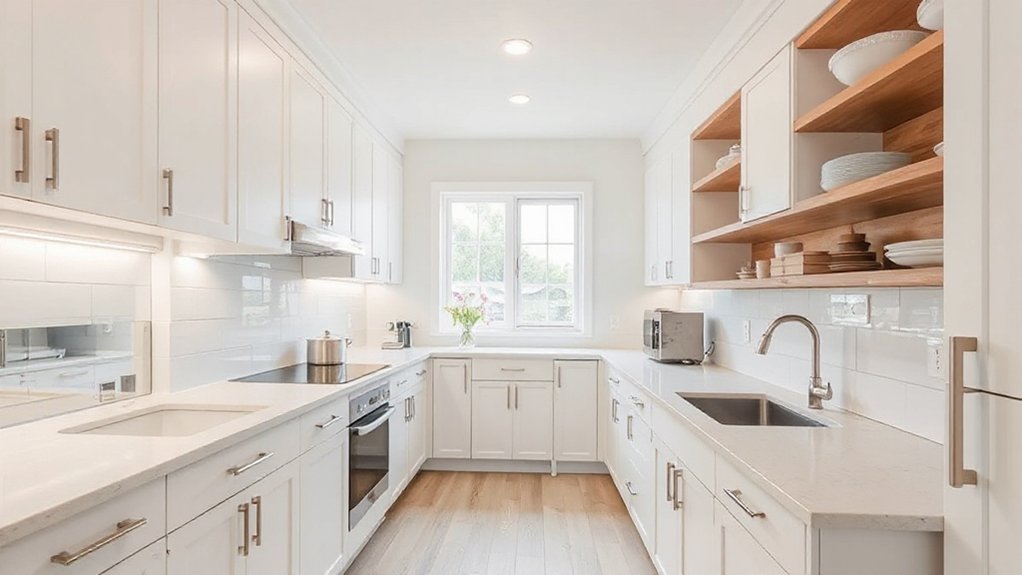
Run Cabinets to the Ceiling (No Dust Gap)
When you run your upper cabinets all the way to the ceiling, you gain closed storage, sharpen the room’s sightlines, and eliminate the grimy dust gap that’s hard to clean in a small kitchen. You’ll make the space feel taller and more intentional because the cabinet line becomes a clean, continuous plane. Specify a simple crown or scribe molding to bridge any ceiling unevenness, so everything looks built-in, not boxed. For Cabinet aesthetics, match door styles and sheen to your wall color for a seamless look, or contrast for crisp definition. Protect Material durability by choosing moisture-resistant finishes, quality hinges, and thicker shelves for heavier items. Add interior lighting so the top section stays usable, not forgotten, and keep handles consistent for visual calm.
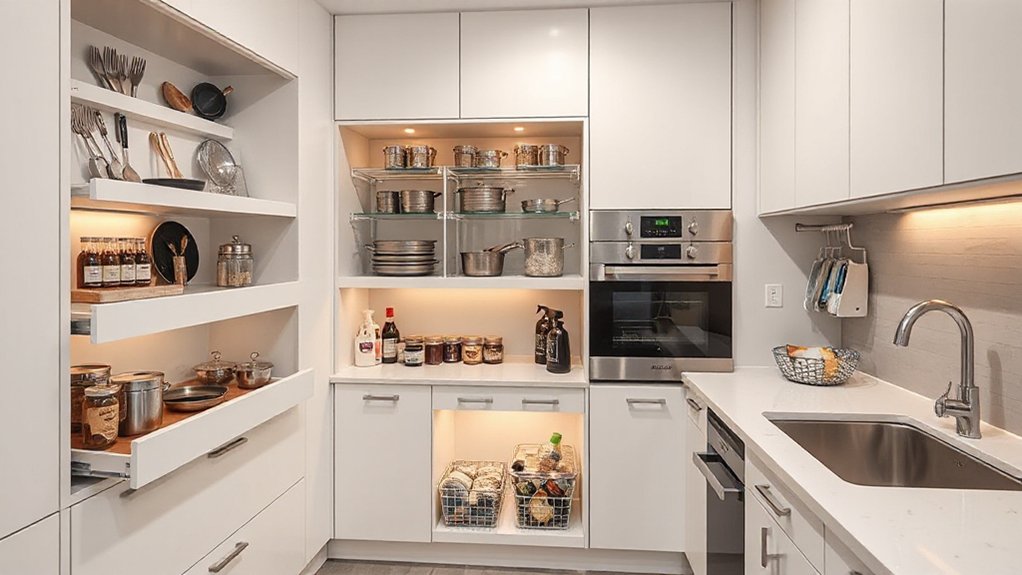
Add Hidden Storage: Doors, Corners, Toe-Kicks
Because every inch matters in a small kitchen, you’ll get the most impact by converting “dead” zones—cabinet doors, blind corners, and toe-kicks—into hidden storage that keeps counters clear. Mount slim racks or magnetic strips on door interiors for wraps, lids, and spices, and add Hidden compartments behind decorative panels for rarely used gadgets. In corners, specify corner solutions like a compact swing-out shelf or diagonal cabinet that lets you reach items without wasted voids. Don’t ignore the toe-kick: build a shallow, push-to-open drawer for baking sheets, placemats, or pet supplies, keeping them out of sight but close at hand. You’ll gain capacity without changing your footprint, and cleaning stays faster with fewer countertop piles.
Use Drawers, Pull-Outs, and Organizers to Declutter
If you want your small kitchen to feel calmer without sacrificing function, swap hard-to-reach base cabinets for drawers, pull-outs, and purpose-built organizers that put every item in one quick-grab layer. Deep drawers hold pots and pantry staples without stacking chaos, while narrow pull-outs park spices, oils, and trays in tight gaps you’d otherwise waste. Add drawer dividers for utensils, wraps, and tools so nothing slides, tangles, or disappears. Use shelf organizers to tier plates, mugs, and cans, then label zones so you’ll reset fast after cooking. Prioritize full-extension slides and soft-close hardware to maximize visibility and reduce noise. When you plan these inserts around how you cook, you’ll cut steps, free counter space, and keep the room looking intentional daily.
Choose Compact Appliances That Still Perform
Streamlined drawers and pull-outs keep your tools in order, but bulky appliances can still steal the space you just gained. Choose compact models that match your cooking habits: a 24-inch counter-depth fridge, an 18-inch dishwasher, or a slim induction range that boils fast and stays cool to the touch. Look for Energy efficient options with high ratings, inverter motors, and quick-heat features so you don’t sacrifice performance for footprint. Prioritize multi-function units—microwave-convection combos or venting hood-microwaves—when you need one cavity to do two jobs. Keep Aesthetic considerations tight: consistent finishes, low-profile handles, and panel-ready fronts reduce visual clutter and make your small kitchen feel calmer and larger overall.
Make Counters Work Harder With Smart Accessories
Make your counters earn their footprint by adding multi-use organizers that corral oils, utensils, and daily tools into one tight zone. Choose space-saving prep accessories—over-sink cutting boards, nesting bowls, and fold-flat racks—so you gain work surface without adding clutter. You’ll cook faster, clean easier, and keep sightlines clear in a small kitchen.
Multi-Use Counter Organizers
Because counter space disappears fast in a small kitchen, multi-use counter organizers let you stack, corral, and stage daily essentials without cluttering your prep zone. Choose tiered risers for oils and spices, then tuck a slim caddy beside the sink for soap, brushes, and sponges. Add a tray that groups your coffee setup so cords, pods, and mugs stay contained and you maintain clean appliance integration. Use vertical stands for cutting boards and lids to stop piles from spreading. Look for pieces with wipeable finishes, non-slip feet, and modular parts you can reconfigure as your routine changes. Finish with restrained decorative accents—one small plant or a matching canister set—so your counter reads intentional, not crowded. Keep sightlines open for a larger feel.
Space-Saving Prep Accessories
Where do you prep when every inch of counter matters? You make the surface flexible with space-saving accessories that set up fast and store flat. Slide a fitted over-sink cutting board across the basin to gain a full prep zone, then rinse straight into the drain. Add a roll-up drying rack that doubles as a trivet, cooling station, or produce shelf. Choose a nesting prep bowl set with lids so you can chop, sort, and refrigerate without extra containers. Clamp on a slim rail with hooks for measuring spoons and a paper-towel arm to clear the worktop. Finish with Smart lighting under cabinets and subtle tech integration like a magnetic recipe screen or charging pad to keep tools handy, not scattered.
Add an Island: or Try a Slim Cart or Peninsula
If you want more prep space and storage without crowding your layout, you can add a compact island designed for tight clearances. When floor space is limited, you’ll choose between a slim rolling cart you can park away and a peninsula that anchors to existing cabinets for a built-in feel. The right pick depends on how you move through the kitchen, where you need outlets and seating, and how much flexibility you want day to day.
Space-Saving Island Options
Wondering how to add prep space and storage without crowding your small kitchen? Choose an island that’s sized for tight clearances and built for compact design. You’ll want at least 36 inches of walkway on all working sides, so measure doors, drawers, and appliance swings before you buy.
Pick a narrow island (18–24 inches deep) with a butcher-block top for daily prep, then add deep drawers for pots and utensils, a pull-out trash bin, and a towel bar to keep counters clear. If you entertain, include a 10–12 inch overhang for two stools, but keep corners rounded to prevent bumps. Match finishes to your cabinetry for aesthetic appeal, and use locking casters so you can reposition it when you need more floor space.
Slim Cart Vs Peninsula
Short on clearance but still need more prep room and storage? A slim cart gives you flexibility without committing floor space. Choose one 10–14 inches deep, with locking casters, a butcher-block top, and shelves sized for mixing bowls or small appliances. Roll it to the sink for prep, then park it beside the fridge as a landing zone. When guests arrive, you can tuck it away.
A peninsula delivers a built-in solution when you can spare a fixed footprint. Anchor it to a wall or base cabinet run, keep at least 36 inches of walkway, and add drawers, pull-outs, or a narrow overhang for two stools. You’ll gain continuous counter space, better workflow, and dedicated storage daily.
Use Light and Reflective Finishes to Feel Bigger
Because light bounces, the right palette and finishes can make your small kitchen read larger without moving a single wall. Start with a soft, low-contrast color scheme: warm whites, light greiges, and matching trim so edges visually recede. Specify satin or semi-gloss paint where you need wipeability; it catches light without looking wet. Layer Lighting techniques: under-cabinet LED strips to erase counter shadows, a slim ceiling fixture for ambient fill, and a focused pendant over prep. Choose reflective surfaces strategically—glossy backsplash tile, stainless appliances, or a mirrored toe-kick—to multiply brightness without adding clutter. Keep counters in pale quartz or solid surface, and use glass-front uppers sparingly to lighten the wall while still storing essentials neatly.
Small-Kitchen Mistakes That Steal Space
If you want your small kitchen to feel larger, you can’t let oversized appliances and bulky fixtures crowd your work zones. You’ll also lose valuable inches when storage isn’t planned around what you actually use, leaving gaps, dead corners, and wasted vertical space. Keep countertops clear by assigning every item a home, so your prep area stays open, efficient, and easy to maintain.
Oversized Appliances And Fixtures
Where does your square footage disappear fastest in a small kitchen? It vanishes when oversized appliances and bulky fixtures crowd your clearances and choke your work triangle. A deep refrigerator that juts past cabinetry, a range that’s wider than you cook on, or a farm sink that demands extra counter depth all steal precious inches and turning room. Prioritize precise appliance placement: choose counter-depth refrigeration, 24-inch ranges, and slim dishwashers when they fit your cooking habits. Then tighten fixture selection: swap heavy pendant clusters for low-profile lighting, pick a compact single-bowl sink, and use a pull-down faucet with minimal reach. You’ll gain smoother circulation, longer usable counters, and a kitchen that feels tailored, not cramped.
Poor Storage Planning Choices
Even with right-sized appliances, a small kitchen still feels tight when storage gets planned as an afterthought. You lose inches to dead corners, mismatched cabinet depths, and drawers that can’t clear pulls or appliances. A cluttered pantry often comes from shallow layouts and no zones, so staples drift and duplicates pile up. Inefficient shelving wastes vertical space when heights don’t match your canisters, small appliances, or bakeware.
You can fix this by mapping what you own, then assigning it to specific volumes: deep drawers for pots, full-extension trays for lower cabinets, and tiered risers for short shelves. Add dividers, labeled bins, and adjustable standards so storage adapts as your needs change. Plan clearances before ordering cabinetry.
Cluttered Countertop Surfaces
Because every square inch has to earn its keep in a small kitchen, cluttered countertops shrink your usable prep zone faster than any oversized appliance. When Counter clutter builds up—mail, knives, spice racks, small gadgets—you lose landing space for hot pans and staging ingredients, and your workflow slows.
Fix it with ruthless Surface organization. Keep only daily-use items out: one soap set, one utensil crock, one cutting board. Mount a magnetic strip and under-cabinet hooks for tools. Store oils and spices on a slim pull-out or tray you can lift off when you prep. Corral charging stations inside a drawer. Use a single “drop zone” bin for papers, and empty it weekly. You’ll regain clear zones that feel larger and function safer.
Frequently Asked Questions
What Is the Typical Cost Range for Redesigning a Small Kitchen?
You’ll typically spend $10,000–$30,000 to redesign a small kitchen, or $35,000+ for upscale. You’ll weigh cost considerations like cabinets, labor, and appliances, and tighten budget planning with clear priorities and quotes.
Do I Need Permits to Move Plumbing, Gas, or Electrical Lines?
Yes—you’ll likely need permits; don’t let that little paperwork storm rattle you. Permit requirements vary, but Plumbing relocation and any gas/electrical line moves usually trigger inspections. You’ll check local codes and hire licensed pros.
How Long Does a Small Kitchen Renovation Usually Take Start to Finish?
You’ll usually need 4–8 weeks start to finish. You’ll lock the kitchen layout in week 1, finalize material selection week 2, then demo, rough-ins, cabinets, counters, and punch-list follow. Permits can extend timelines.
How Can I Match New Cabinets With Existing Flooring or Wall Colors?
You’ll match new cabinets by sampling finishes like a careful sailor reading tides: use cabinet color coordination with undertone swatches, then apply flooring matching techniques—repeat one warm/cool note, balance contrast, and test in your lighting.
What Are the Best Options for Renting While the Kitchen Is Remodeled?
Choose Temporary housing: short-term furnished rentals, extended-stay hotels, or a sublet near work. Use Rental negotiations to secure flexible leases, prorated rates, and move-in/out clauses. Confirm kitchen access, utilities, storage, parking, cleaning.
Conclusion
You don’t need a wrecking ball to make your small kitchen feel mansion-sized—you need ruthless, smart choices. You measure clearances like a surgeon, pick a layout that stops traffic jams, and carve clear zones for prep, cook, clean, and coffee. You run cabinets to the ceiling so every inch works overtime. You stack accessories, add a slim cart or peninsula, and bounce light off reflective finishes—until the room feels twice its size, and nothing’s wasted.